
The version used for this article is mlflow 1.4.0
Hello, In this article I am going to make an experimentation on a tool called mlflow that come out last year to help data scientist to better manage their machine learning model.
The idea of this article is not to build the perfect model for the use case where I am going to build a machine learning model, but more to dive on the functionalities of mlflow and see how it can be integrate in a ML pipeline to bring efficiency in the daily basis for a data scientist/ machine learning engineer.
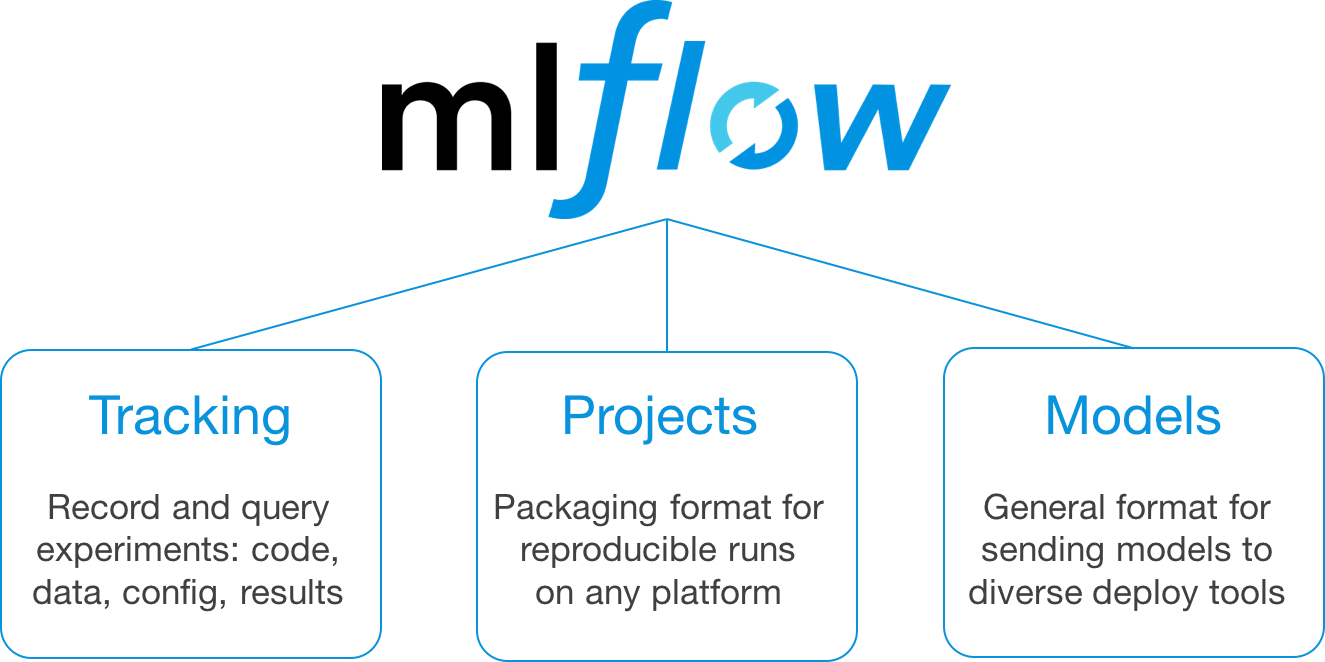
mlflow kezako ?!
mlflow is a python package developed by databricks that is defined has an open source platform for the machine learning lifecycle. There is three pillars around mlflow (Tracking/Projects/Models).
Their documentation is really great and they have a nice tutorial to explain the component of mlflow. For this article I am going to focus my test on the Tracking and Models parts of mlflow because I will be honest with you I didn’t see the point on the Project part (looks like a conda export and a config file to run python script in a specific order) but I am sure it can help some people on the reproductive aspect of an ml pipeline.
Let’s have a look now on the case that I want to use to test mlflow.
Description of the use case
To test mlflow I am going to use the same use case that I used to complete my Udacity ML engineer nanodegree in 2017:
Build a forecast system of the electricity consumption in France
You can find all the resources that I produced at this moment in this folder of my Github repository about the nanodegree.
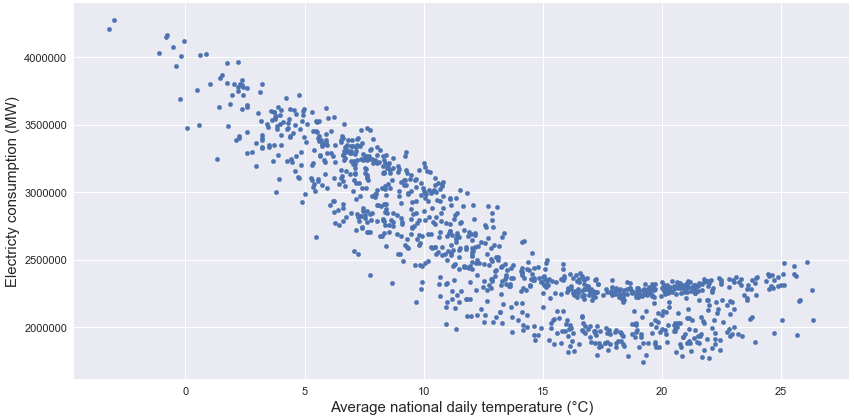
I am not going to enter to much in details in the analysis of the data that you can find in the report in the repository but basically the electricity consumption in France is seasonal.

And as the households are most of the time using electrical heating, the consumption is very dependent to the outdoor temperature.
More important thing about this analysis, to rerun it in 2019 I went back to the opendata website of RTE and I had the nice surprise to see that the website evolved by adding more data on the platform (they associated themselves with other energy management companies) so now there is the energy consumption data and some extra information like the regional weather for example.
For this project I am just going to use the following features to train a model:
- Information on the day like the day of the week, month, week number and if it’s a day off in France with the package holidays)
- Information on the daily outdoor temperature (Min, Mean and Max) in France, one it’s just a global average of the outdoor temperature in each region (avg) and the other one is a weighted average based on the number of people in each region
You can find the notebook that process the raw data from open in this repository
For the modelisation part, as I said the idea is not to build the super model that will forecast the energy comsumption like with 99.999% accuracy but more seeing how to integrate mlflow in the pipeline that I built one year ago for my nanodegree.
I am going to test the following models:
- a KNN regressor from scikit learn (with various parameter and features)
- a MLP regressor from scikit learn (with various parameter and features)
- a hand crafted piecewise linear regression called PTG
The idea will be to use the data for 2016 to 2019 (excluded) for training and testing the algorithm on the data of 2019.
Description of the machine learning pipeline
In the following figure there is my vision of a simple ml flow pipeline to answer this kind of use case.
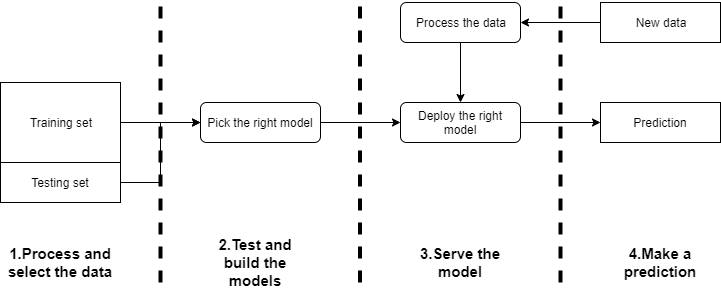
There is 4 main steps in this ML pipeline:
- the first one is to collect all the data, build the features that will be used to make the predictor
- the testing and building phase where the right model with the right parameter is going to be build with the training data and test on the testing set
- The serving part where when you have the right model you need to serve it to use it to make prediction
- The prediction part when you have new data that will be processed to be transform on features that can be used to make a prediction with the model served
So where mlflow is fitting in this pipeline ?
For me the library is fitting clearly on the step 2,3 and a little bit on 4 and that’s really great to cover all this scope.
Let’s have a look now more in details on the usage of mlflow.
Test and build the models (mlflow Tracking)
As we say previously we will need to find the right models to fit this forecast problem.To initialize the pipeline we will need to define an experiment, that will be electricityconsumption-forecast , that will have an experimentid too (1 in this case).
Every test of a model (models or parameters) will be defined has a run in mlflow (and tagged by runid) and store in the mlruns folder that will appears in the current folder.
To organise my code I keep the same structure that on the mlflow tutorial . There is an exemple of a piece of my code to train a KNN regressor.
With this approach, every model is tagged by the kind of model and the features used to build it. For the metrics of evaluation I am focusing my evaluation on:
- accuracy metrics like the RMSE, R-squared, or the mean absolute error
- time of execution of the model.fit and the model.predict because there is more than the accuracy to choose a good model.
I am applying this approach to all the models and all the data are stored on the mlruns folder.
To use the mlflow UI just need to execute the following command in your working directory.
mlflow uiYou should access the UI by the page localhost:5000, and choose the right experiment. There is a screenshot of the main page of an experiment.
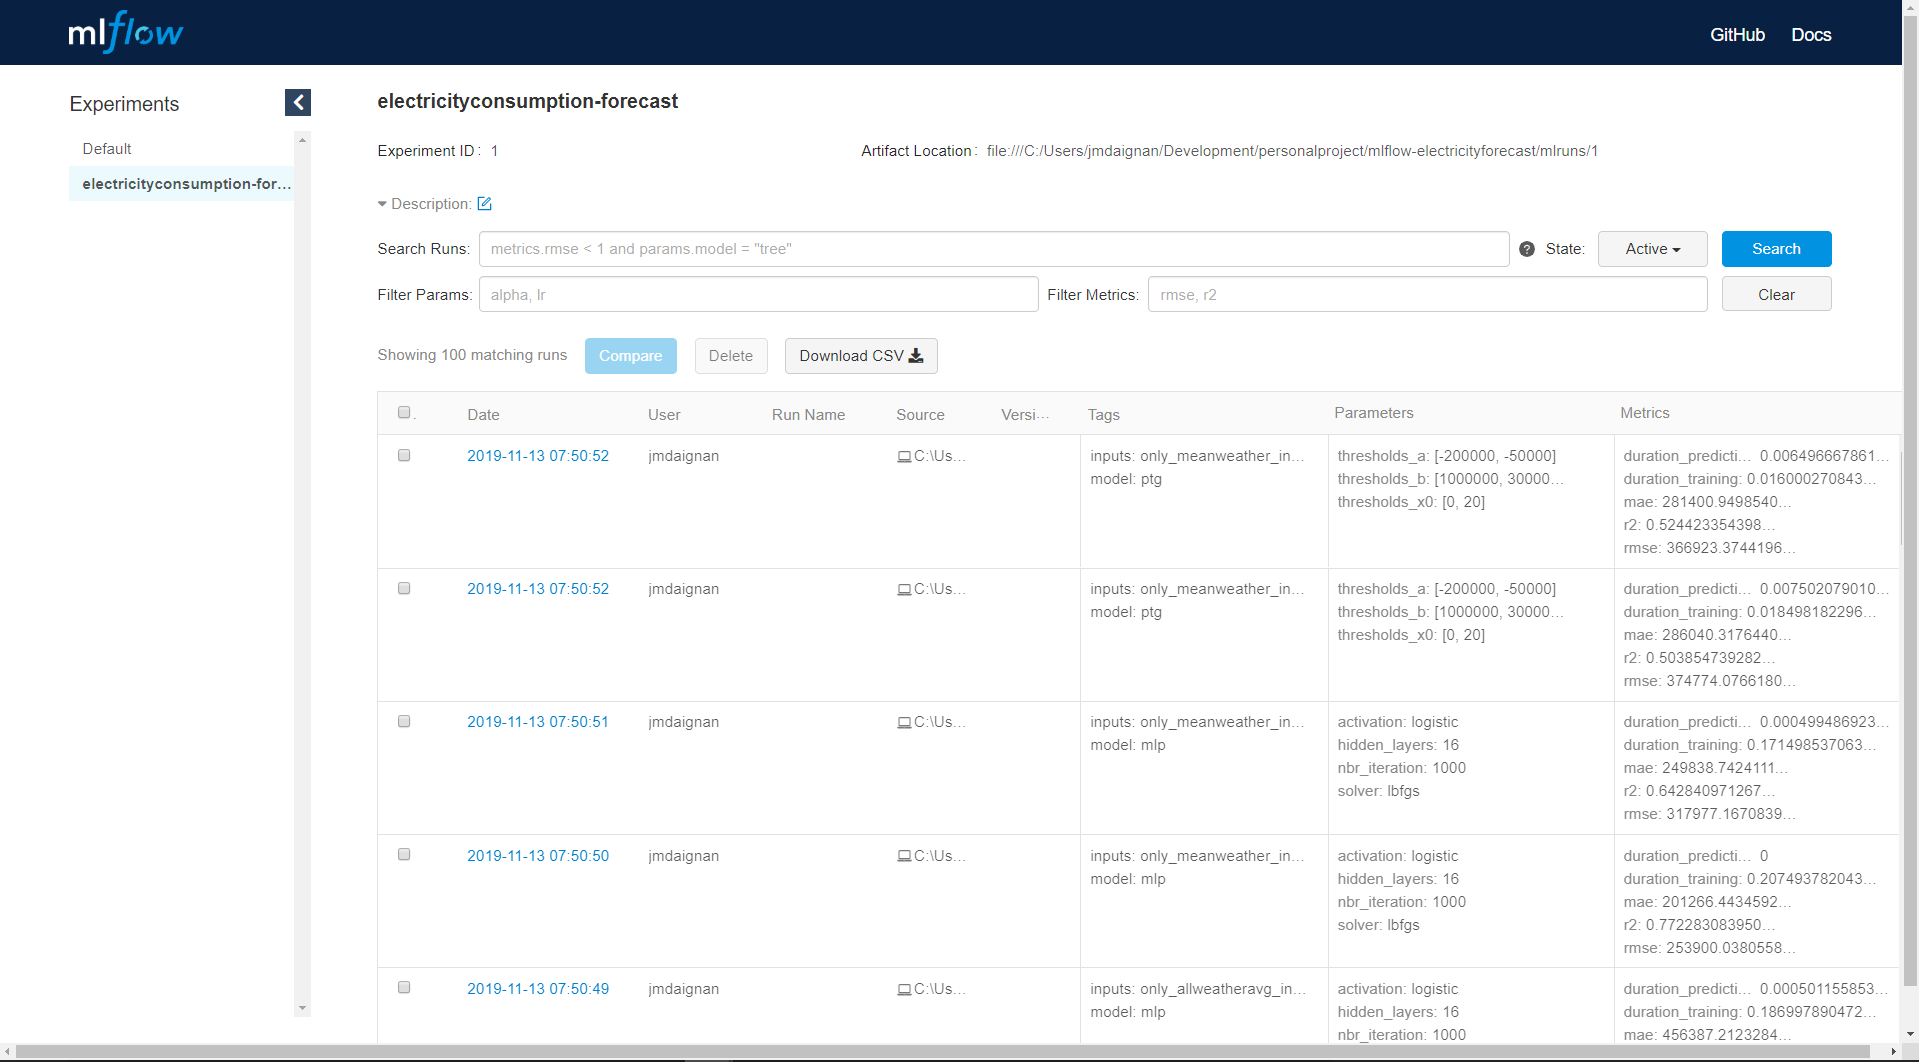
There is on this page all the metrics compute for each model with all the tags that can have been associated and some extra information on the user and the location of the model logged. From this page we can access to each run by clicking on the date of the run.
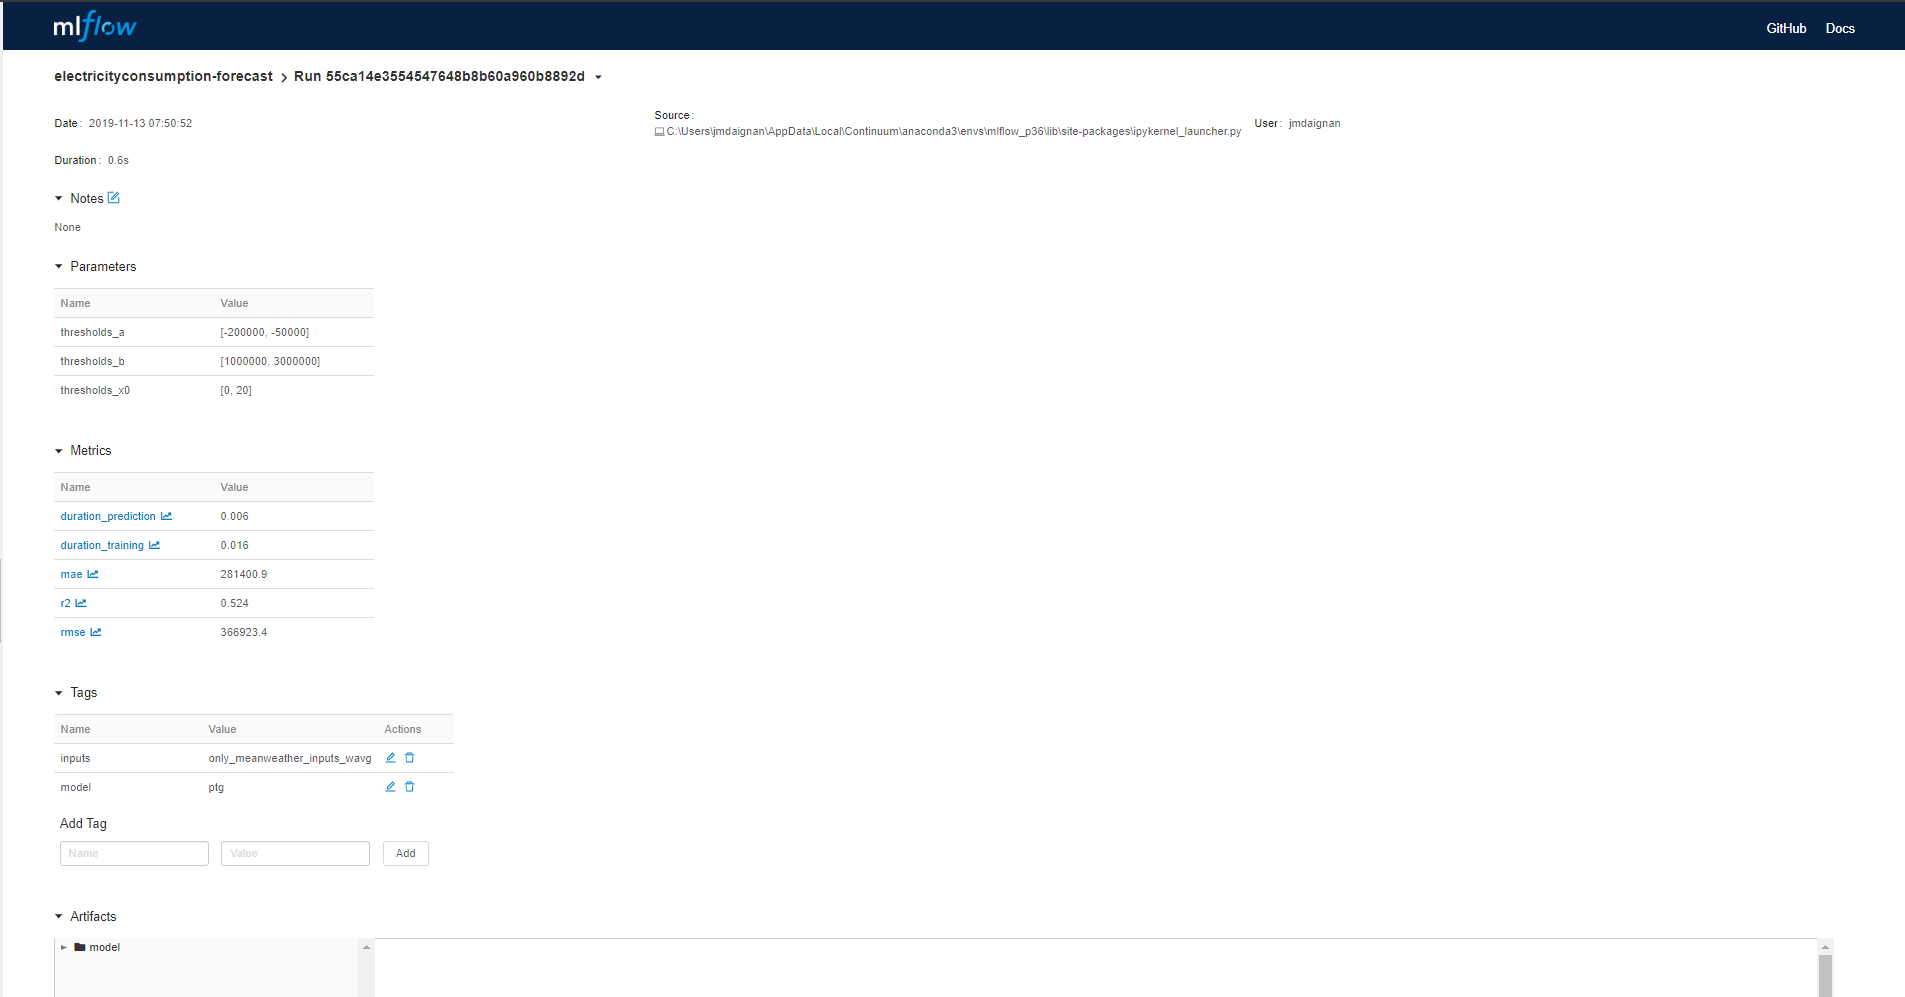
In the page of the run there is :
- the parameter section where you can find the parameter applied in the model
- the metrics computed during the run
- the tags associated to the model
Another important part of the UI is the Artifact where there is the organisation of the folder that contains the information on the model.
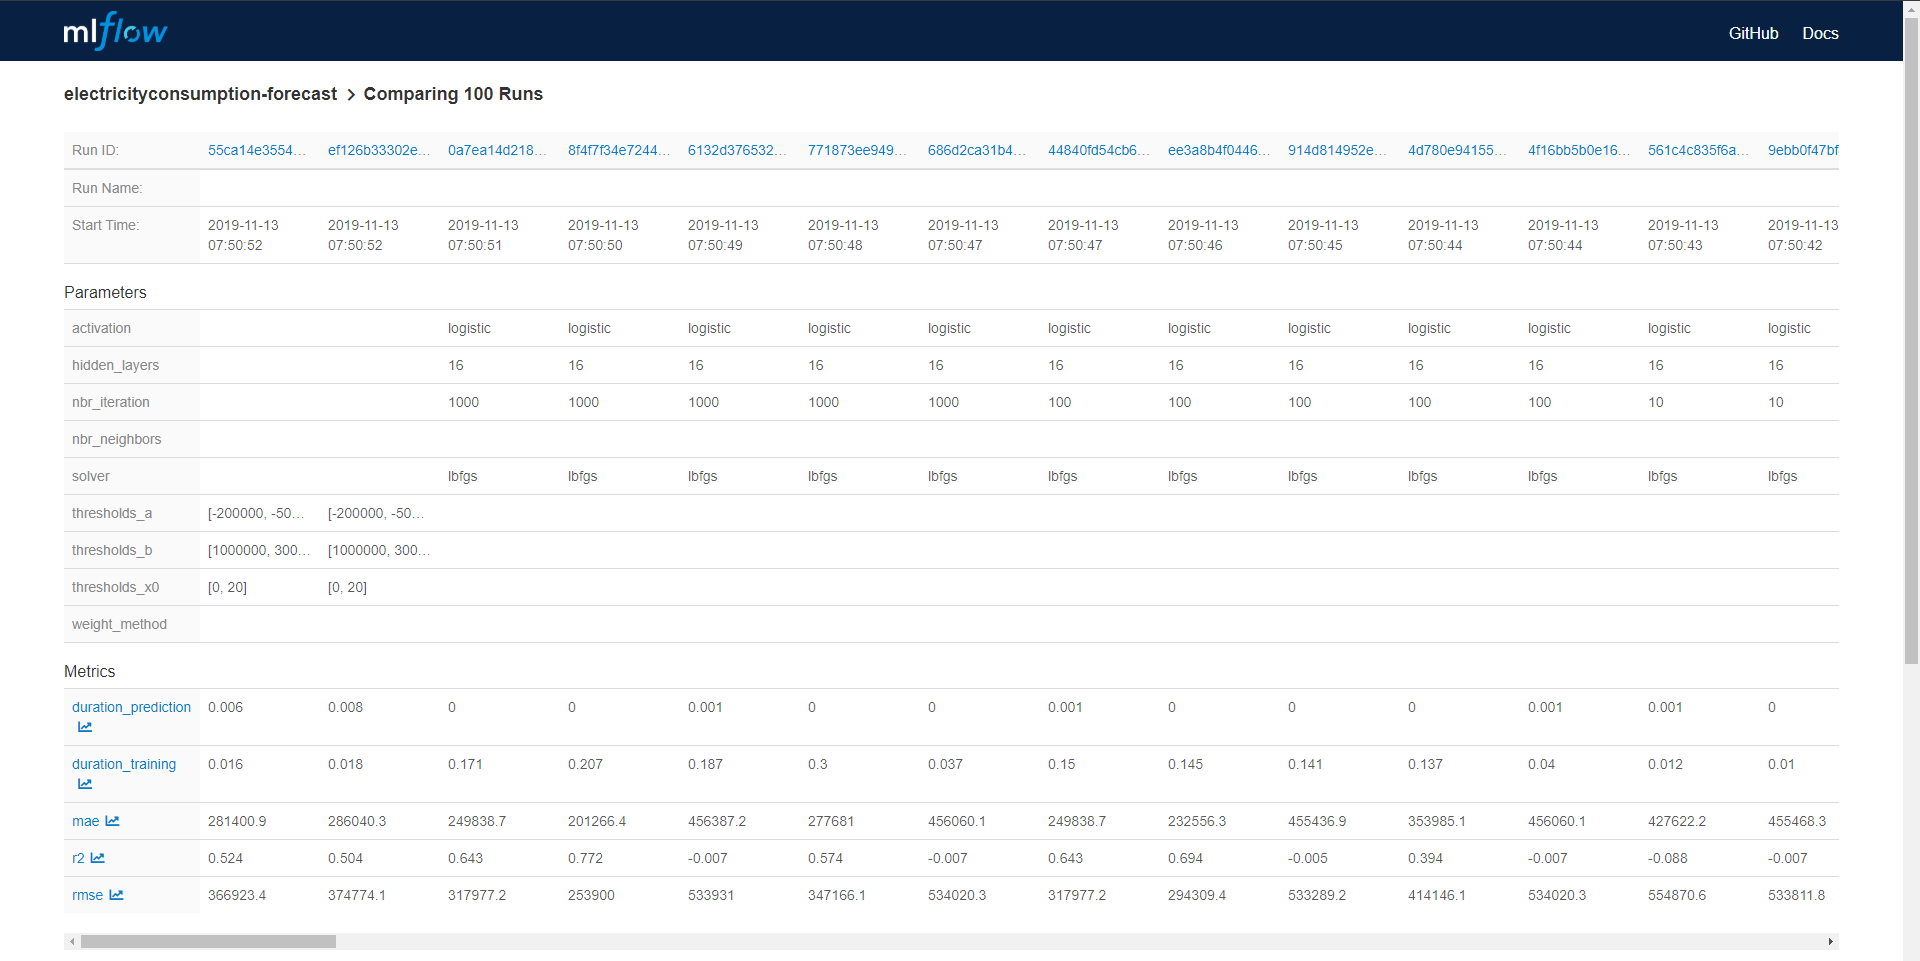
From the main page you can select all the models that can be compare between them. The comparison panel contained two panel one with a table to put model side by side with all the metrics exploded.
And there is another panel to make visualisation with Plotly and compare model between them. I made a quick animation of this visualization panel.

I found this last feature quite limited for the comparison between model of different categories (like KNN versus MLP) seems more adapt to compare model of the family.
But this UI is not the only way to do log analysis, all the logs can be collected in a dataframe with the command in python.
mlflow.search_runs(experiment_ids="1")And you with that some deeper analysis can be done on your python environment, for example get the best model based on the RMSE score. There is a simple analysis made from the logs in Python.
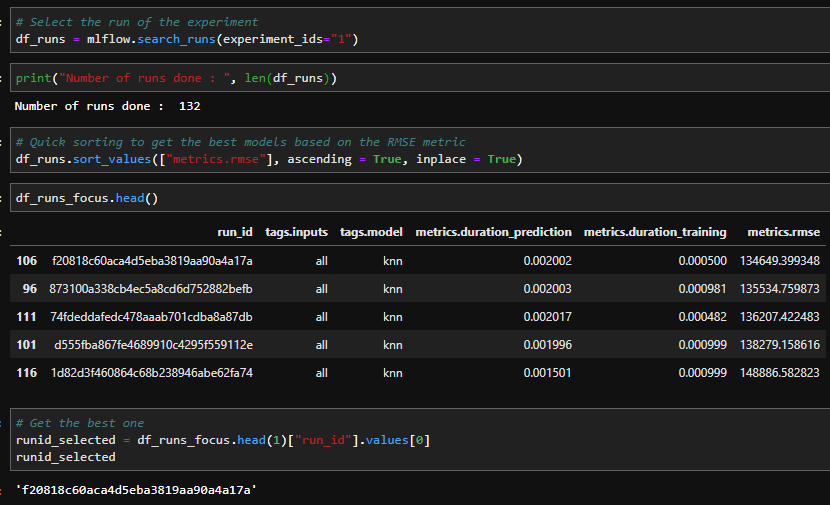
The best model has a specific runid that can be used after that to execute the deployment.
Serving of the model (mlflow Models)
With mlflow you can quickly deploy a local model with the following command:
mlflow serve -m path_to_the_model_stored_with_the_logfuction_of_mlflow -p 1234Just need to guide the mlflow serve command to the folder of the model with the -m and assign a new port (the default one is the same that the one for the mlflow UI and that could be annoying)
To execute a prediction call, you need to send a POST request to the /invocation endpoint of this API with on this parameter a dataframe that has been transformed in json with an orient split (will be more comprehensible with the code for the transformation 👇)
toscore = df_testing.to_json(orient = "split")And after you can easily call the API with a POST request from Postman or Python
import requests
import json

endpoint = "http://localhost:1234/invocations"
headers = {"Content-type": "application/json; format=pandas-split"}
response = requests.post(endpoint, json = json.loads(toscore) , headers=headers)
But now the big question is How to deploy it online ?
mlflow is pretty well done, you have built-in functions to quickly deploy the model on Microsoft AzureML or on AWS Sagemaker. As I am more an AWS guy I am going to focus the deployment on AWS Sagemaker.
The deployment is on two phasis:
- Deploy a container on AWS ECR that will contain your environment to run the model, the deployment is very simple with the following command:
mlflow sagemaker build-and-push-containerOf course the command has to run on a machine that has Docker installed and an AWS user with the correct rights to deploy things on AWS for example mine as admin accesses maybe not the good thing but YOLO.
- After the end of the deployment of the container there is a deploy command for mlflow sagemaker that is very similar to the one used to make local deployment with mlflow
mlflow sagemaker deployBut even on Windows or Linux it didn’t work for me. So I try another approach from this blog post. There is a wrap up of the code in this gist.
The deployment is quite fast (around 10 minutes) and after you can call the API deploy on AWS with this piece of code (from the databricks blog)
So now the model can be called to make forecast of the energy consumption from this endpoint (this approach with an AWS user handle all the authentication so that’s quite secure I guess).
Feedback
I really like to experiment on mlfow, versioning of Machine learning is a big topic in general but at my current company Ubisoft (if you want to join the Ubi family there is maybe a job for you here) it’s starting to be a real big deal.
From my point of view mlflow is really great to make offline experiment and find the right model, and make quick prototype.
I have still some concerns on some very specific topics:
- In a ml model there is the algorithm but the data is very important too so the tags feature can be used to give information on the data used but from my opinion it’s maybe not enough
- The model class need to make the prediction from a Pandas dataframe that’s great but maybe a little bit a constraint too
- Lack of way to document the model automatically on the features/data that have been used to help to make the call to the model deploy behind an API
- Managing model from Tensorflow looks super complicated (pytorch look easier) but this last point is maybe coming from the fact that I am not very familiar with these frameworks (no position in the Tensorflow VS Pytorch war 😀 ).
But honestly great job @databricks you make a really great tool to help data scientist on their experimentation


