
I recently started to prototype an image classifier at work, and this work led me to the fastai package that I had in my backload of libraries for a long time. Two years ago, I built a pipeline to collect the data from turo to build an image classifier, and I never used it, so it is the perfect moment to link the fastai library and the dataset to write a short article.
Data setup
I built a scraper for the website Turo (Airbnb for car rental). As a result, I had a decent amount of images with more than 57 000 for around 51 car manufacturers.
However, for the evaluation of the model, I didn’t want to take images from the one collected two years ago, so I decided to build new ones.
These datasets are composed of the pictures of 100 offers of the city of Austin scrapped at different dates:
- testing 1: 6th of September
- testing 2: 13th of September 2021
With no specific selection on the type of car, just the one available when the search started.
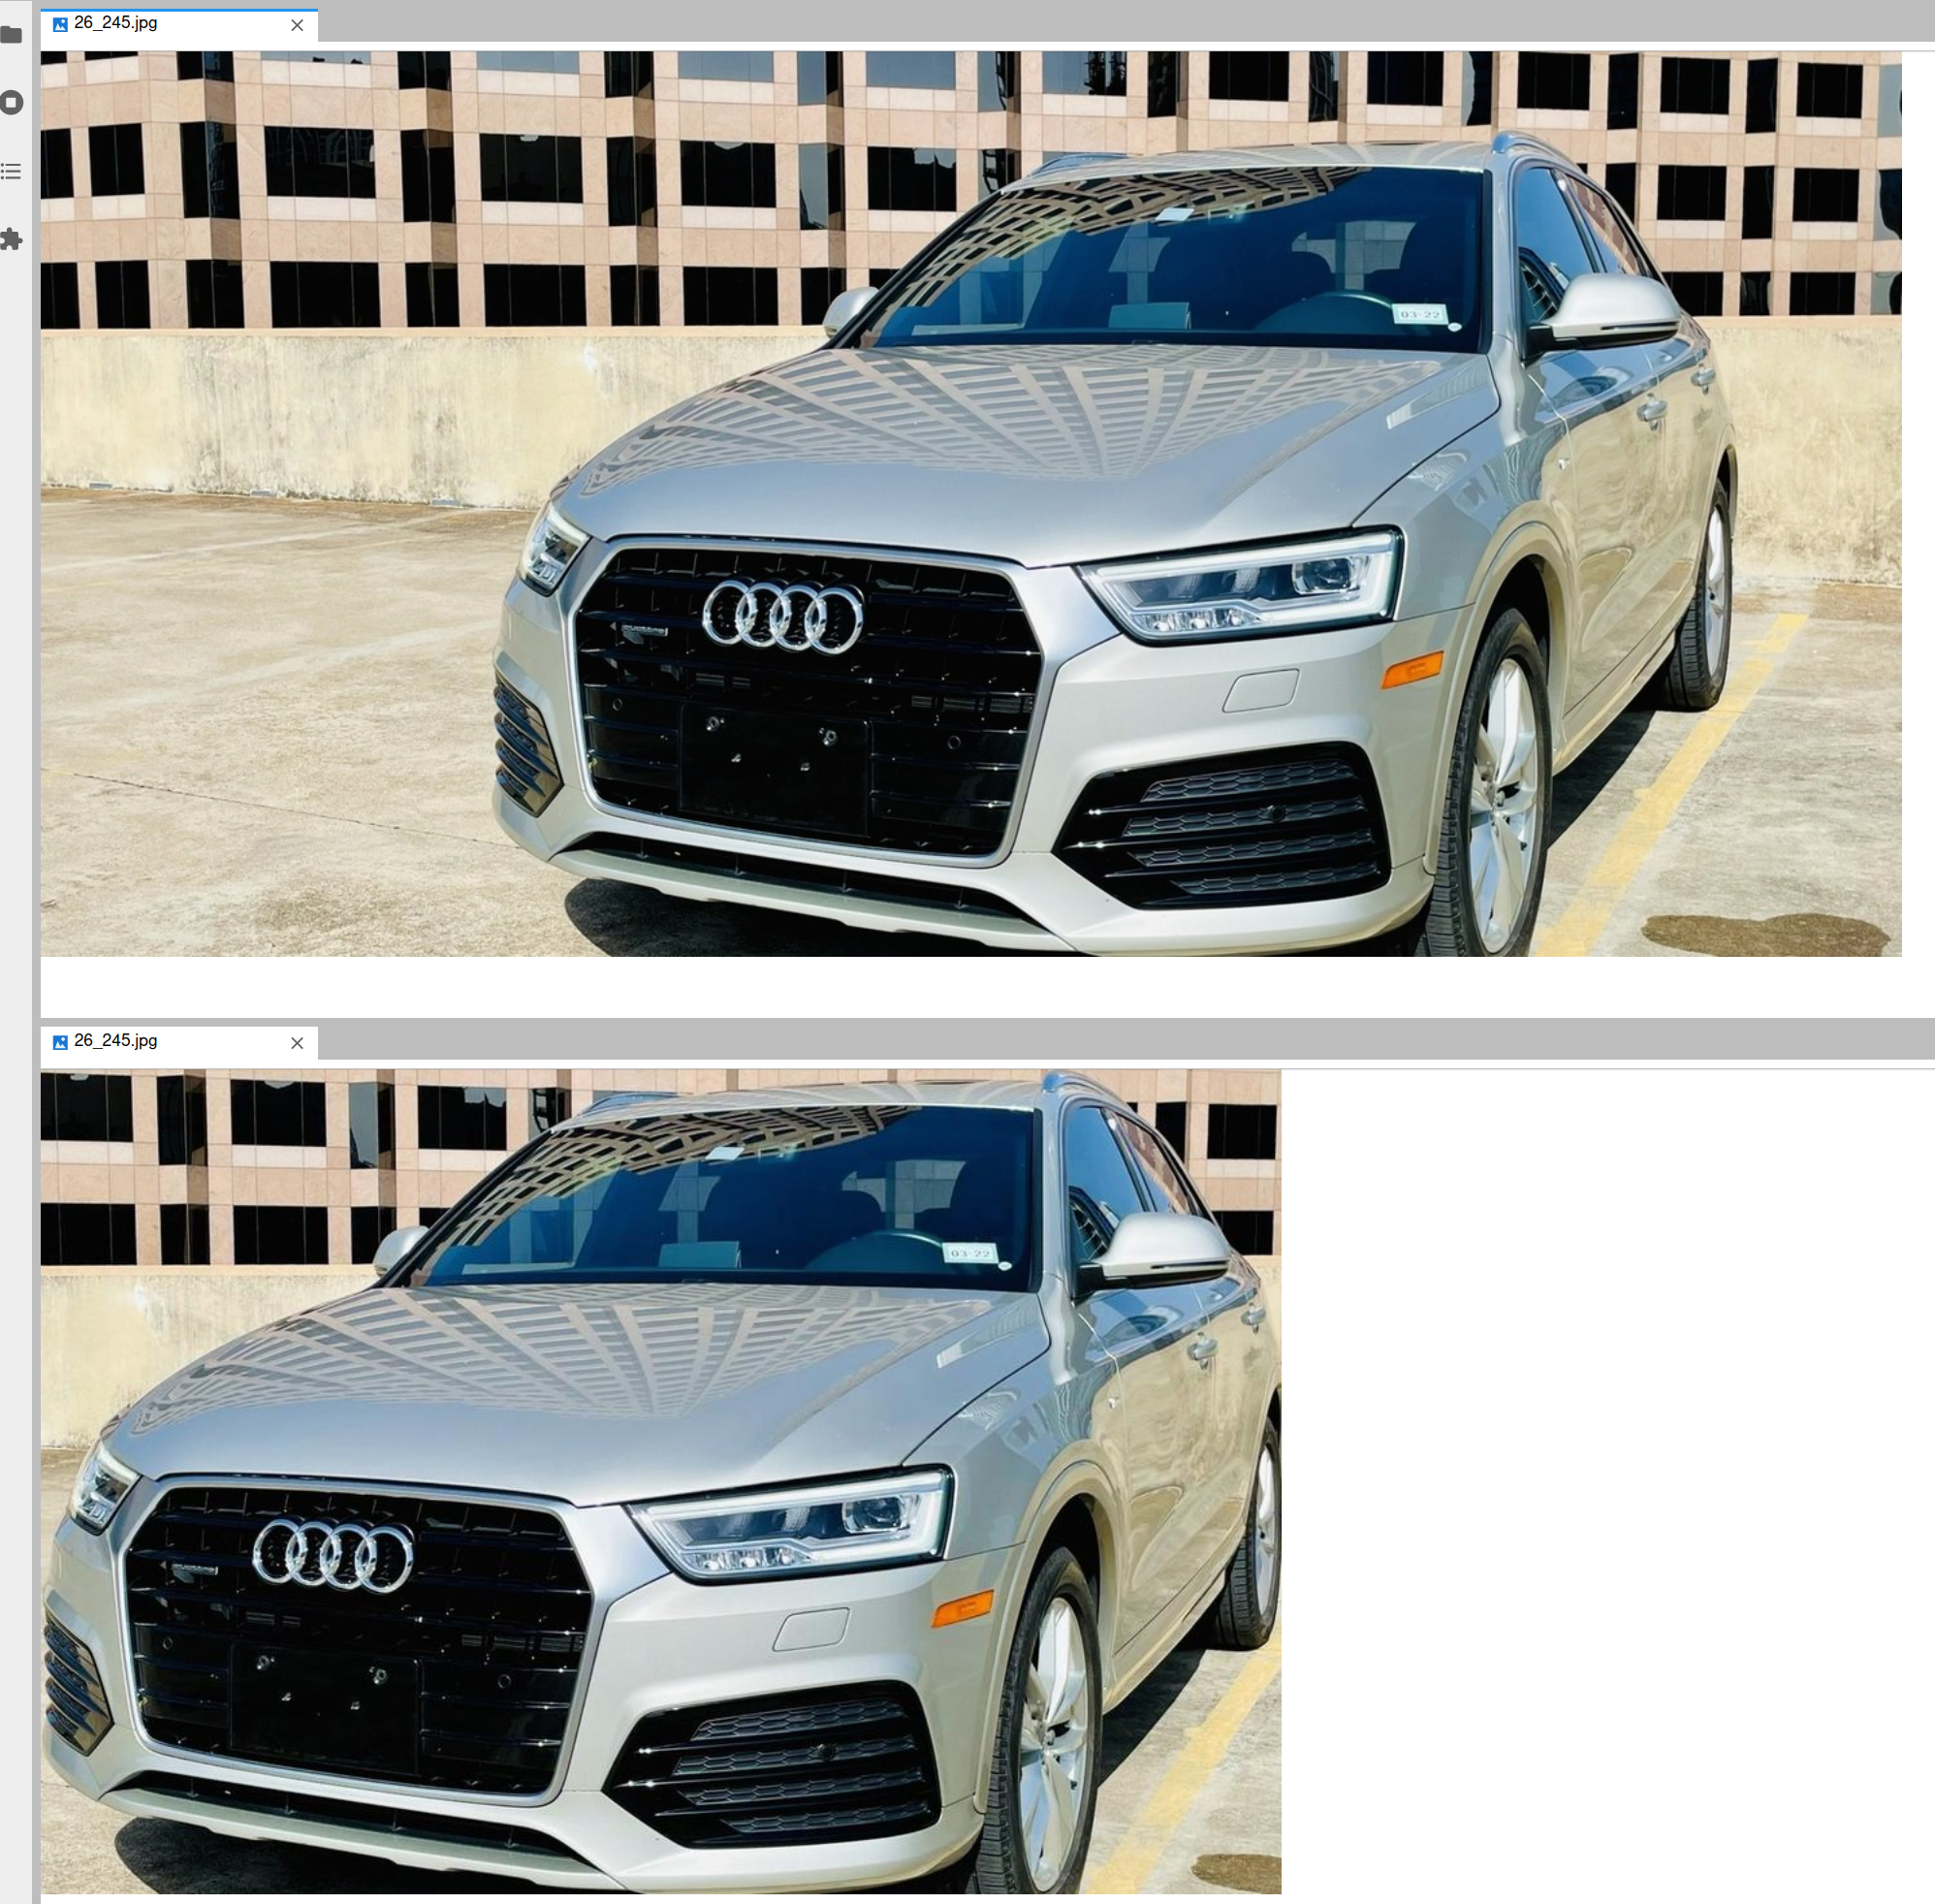
As mentioned in my original article, this data is raw, so the subject is not clearly defined (like multiple cars in the picture, or the car is not centred); I rebuilt for this a cropper to select the car on the image and discard images that contain more than one car or no car for the image classifier that will analyze the image (confidence on the detection superior to 95%).
There is an illustration of the before/after process of the cropper (and the code is here)
With this approach, we have four datasets (two raws and two cropped) available for testing; let’s dive into the framework to prototype the classifier.
Fastai: Making neural nets uncool again
The title is not from me but the slogan on the fastai website.
The fastai is an initiative created by Jeremy Howard and Dr. Rachel Thomas that are very successful scientists, and I am advising you to watch one of their talks; it’s always super interesting (have a look at the about section if you want more details on their experiences). I will say that there is two pillars this initiative that wants to democratized deep learning to the maximum of people all around the world:
Before talking about these pillars, if you’re not familiar with the concept of deep learning, I am inviting you to watch this great video of 3blue1brown on the subject.
The courses are mainly now supported by the content of this book. You can find a notebook version on Github here, these courses are great, and I will invite you to follow them as a good introduction for deep learning, more coder-oriented than math by the prism of using the framework fastai.
The framework was, for me in the first reading, like the Keras of PyTorch (because it’s kind of build on top of PyTorch like Keras was for TensorFlow at the beginning). After the tests with the library, I will change my definition to a wrapper around PyTorch functions and utility function of data management (maybe PyTorch lighting is more the Keras of PyTorch, but I never dig on it).
The package is excellent anyway (and I don’t want to start entering in a church war Tensorflow VS Pytorch); for this test, my first focus has been on this chapter of the book where you are starting to prototype a bear classifier.
There are two parts in this notebook, the first one is the data access and data augmentation, and the second one is the construction of the model:
- Data access and data augmentation: this part is about dataloaders and datablocks (hat templates for the dataloaders). The dataloader will help interpret the file locations and make data augmentations if needed (the notebook is super clear, so dive into it if you want to understand the function more). For this, I will go with the following dataloaders
cars = DataBlock(
blocks=(ImageBlock, CategoryBlock),
get_items=get_image_files,
splitter=RandomSplitter(valid_pct=0.2, seed=42),
get_y=parent_label,
item_tfms=Resize(128))
cars = cars.new(item_tfms=Resize(128), batch_tfms=aug_transforms(mult=2))
dls = cars.dataloaders(path, bs=16)
I am going with the same final transformation than in the notebook (with only a different batch size difference because I encountered issues at some point).
- For the ML part, nothing different than on the notebook, but I will take some time to explain the different functions.
learn = cnn_learner(dls, resnet34, metrics=[error_rate])
learn.fine_tune(4)
There are two functions in this snippet:
- cnn_learner: this function is to “build a convnet” from the dataloader dls and with the architecture resnet18 and to build it used the error rate as a loss function to improve the model during the training. This description can look a bit complex (the convnet part), but I will take some time on the next part to define (or give keys) a convnet but keep in mind that it’s a family of deep learning algorithms. The output of this function is this variable learn that is the model.
- Learn.fine_tune: this function of the model ( inherited from the original class Learner of the fastai framework) is here to fine-tune the convnet to our purpose, in this case, this prediction of the manufacturer of the car with 51 classes.
So now let’s have a look at how the model is performing in two configurations:
- With a sample of the data (10%)
- With the full dataset
The metric of evaluation is going to be :
- Average accuracy of the prediction on the testing sets: if the prediction on the manufacturer is the right one (1) or not (0) on all the records (higher is better)
- Training time: time to train (fine-tune is more accurate, I think) of the model in seconds
Nothing fancy, but I think it’s perfect just to start to prototype something. For the training time there are the results:
- Sample: 192 sec
- Full: 2002 sec
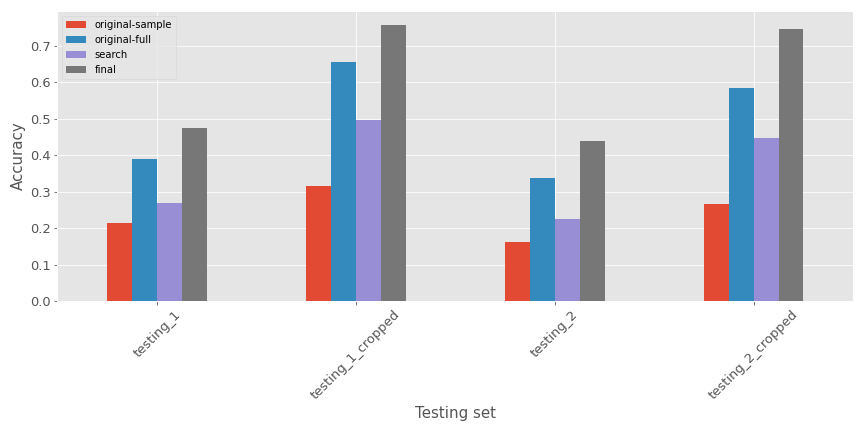
In terms of accuracy for the different testing sets, there are the metrics:
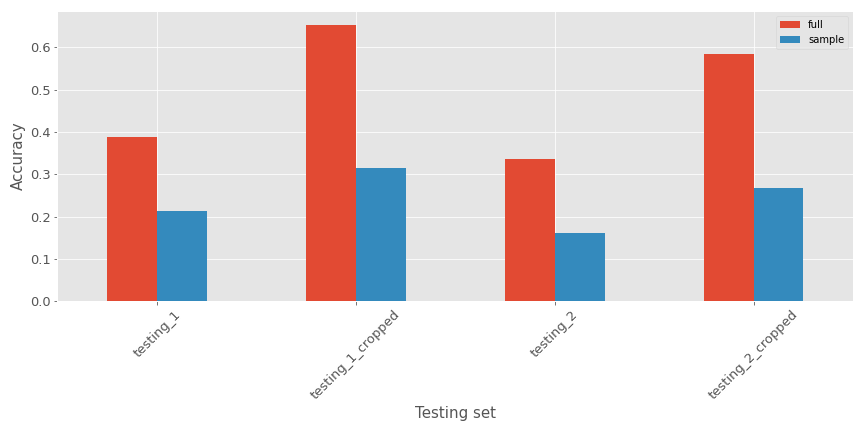
As expected:
- Models are performing less well on the non cropped testing set (expected as the training data looks more like the cropped one)
- The model with the full dataset seems to perform better on all the testing sets
The packages contains other functions to dive more in the output of the model like for example:
- Plot the confusion matrix related to the classifier
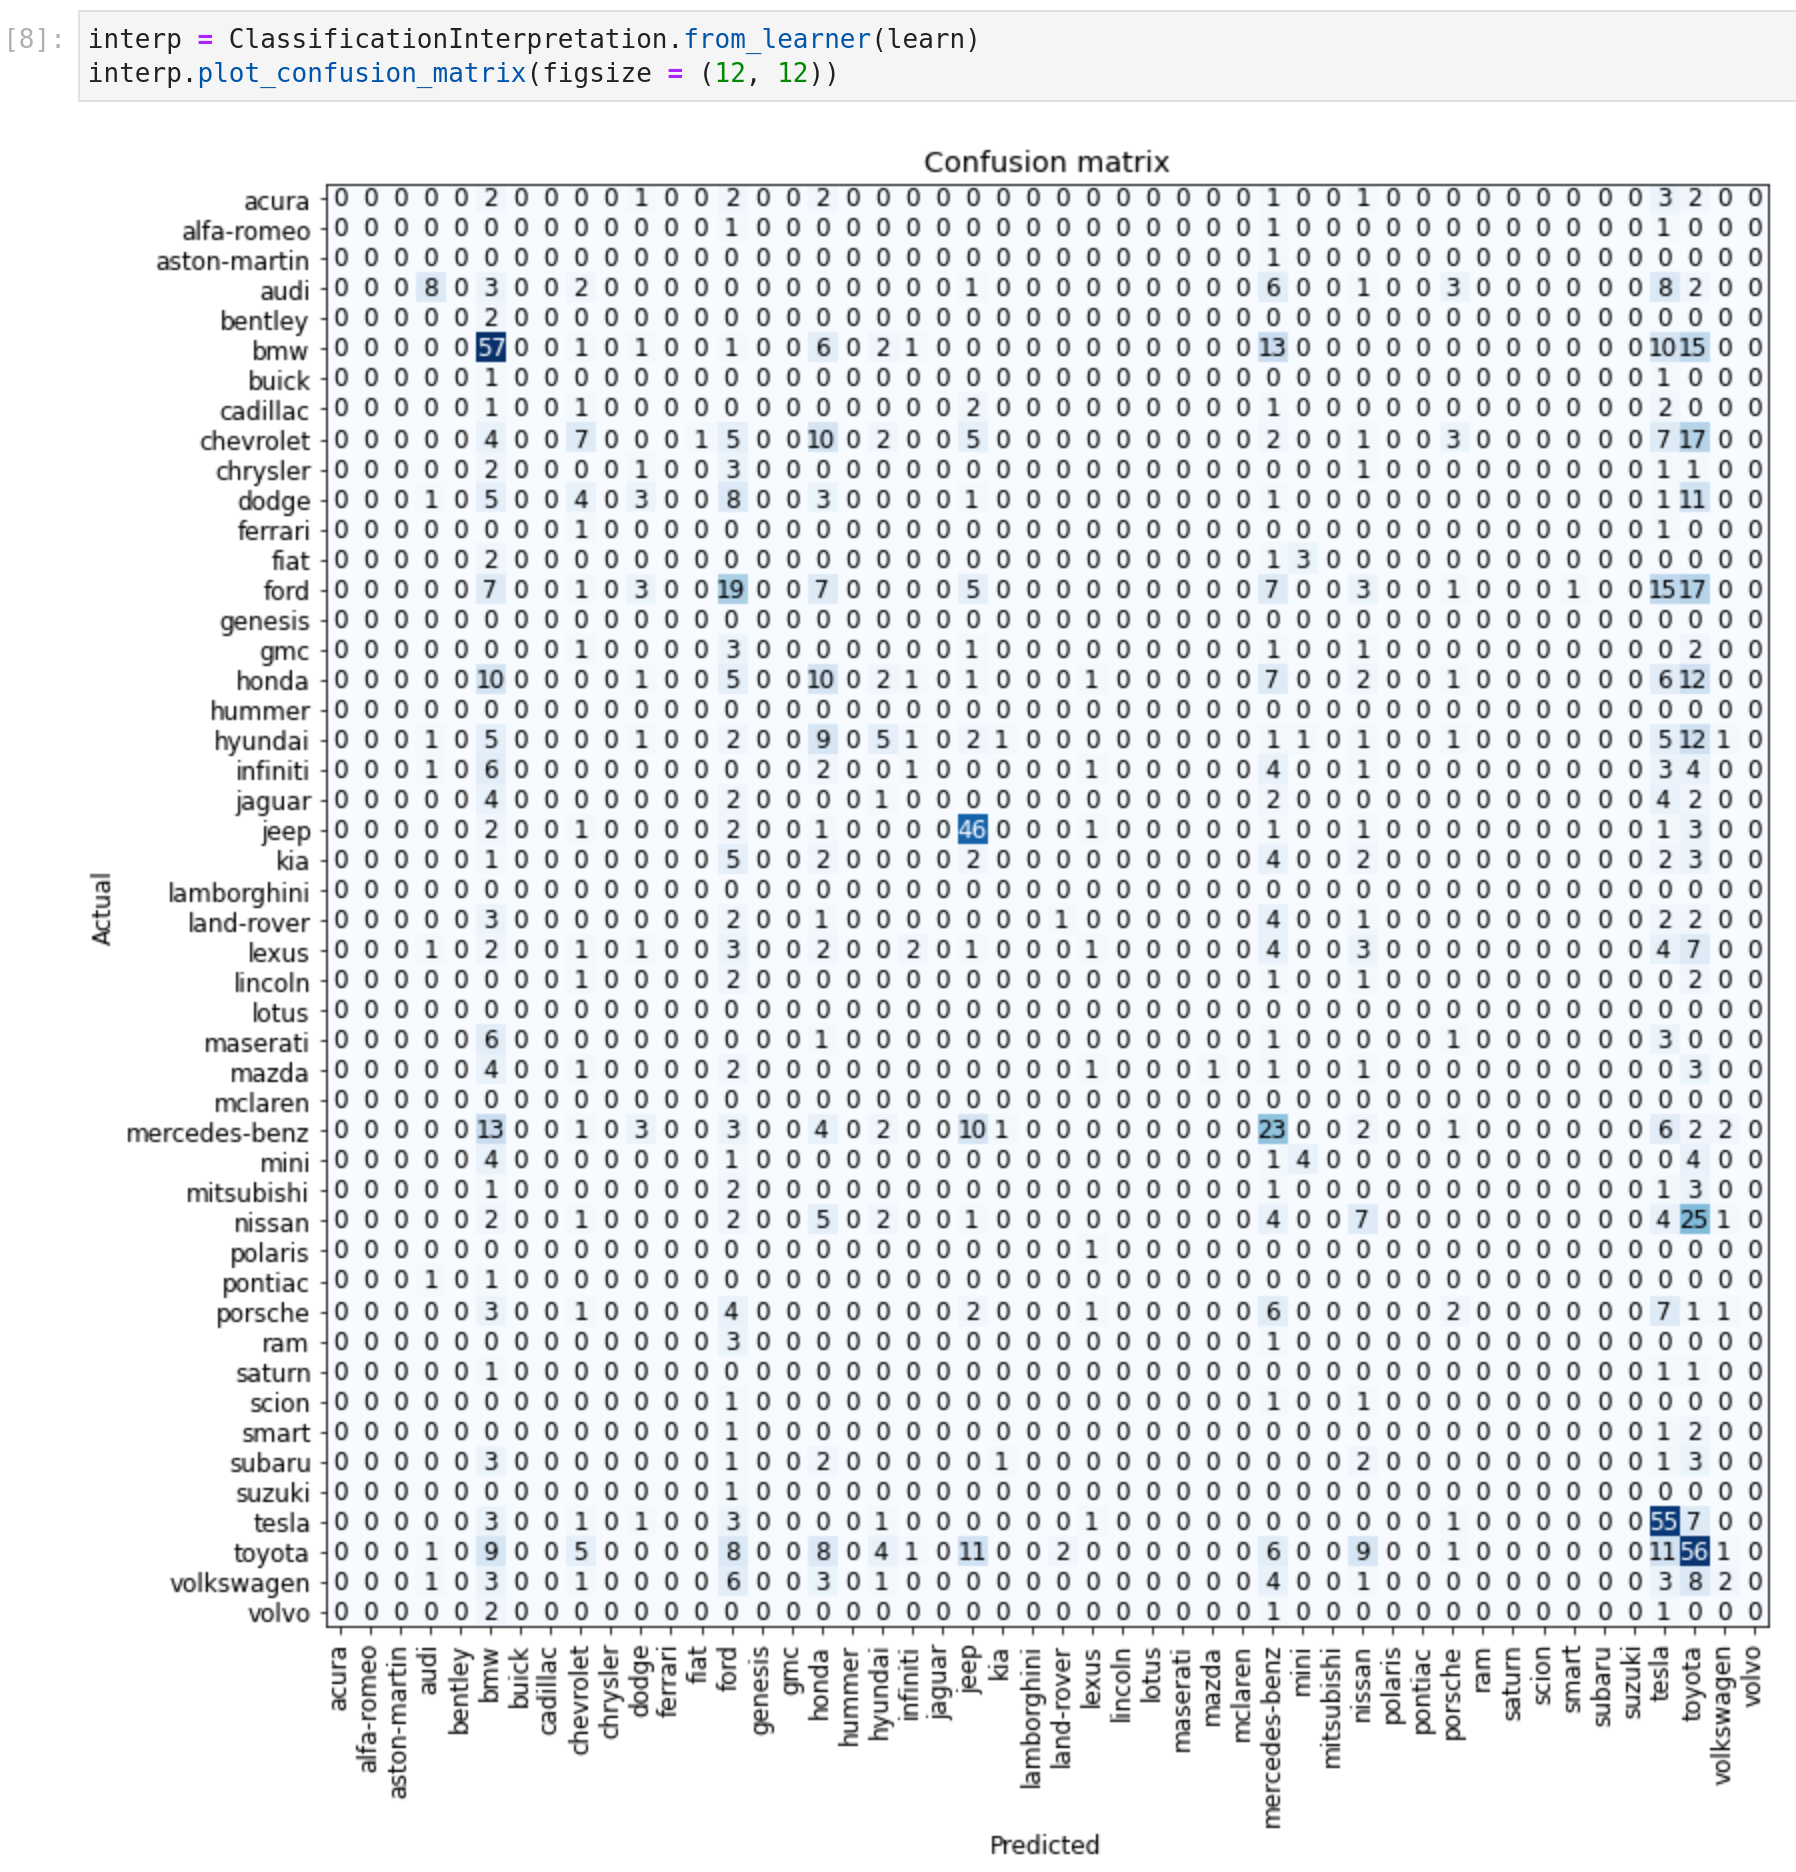
- Get the images with biggest error/loss
So there is an interesting first version, but can we make it be better.
Convolution neural network and grid search
To better understand, I will explain all the theories behind this type of neural network … or not. I have a perfect resource that will do a better job than me to explain; if you don’t know yet, Brandon Rohrer builds a very great collection of courses around ML, and there is a lesson on CNN, with a Youtube recap.
The main layers of this kind of model are:
- Convolution layers
- Pooling layers
- Relu layers
There is a “simplify version” from the course of Brandon Rohrer of a CNN (succession of the different layers)
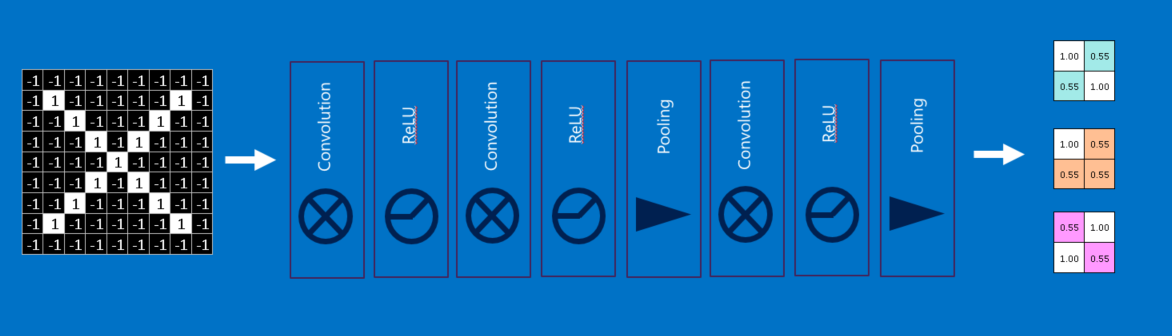
So I hope that this overview of CNN gave you the right insights to understand the structure; if you want a more fastai explanation of CNN, I invite you to look at this chapter of the fastai book with a more hands-on explanation.
From the original code of the book, the architecture used was resnet18; if you want an explanation on the different resnet (that are just a subfamily of CNN that existing I am inviting you to have a look at :
- This article of Kenichi Nakanishi is abording the design of resnet (with fastai).
- This notebook on the book
Let’s start to tweak the model that we used in the previous section by modifying a few parameters:
- The architecture
- The number of epochs
- The base learning rate
To do the research quicker, I will only use the sampled training data.
In this parallel coordinate plot, you can see the impact of the various parameters on the model’s accuracy.
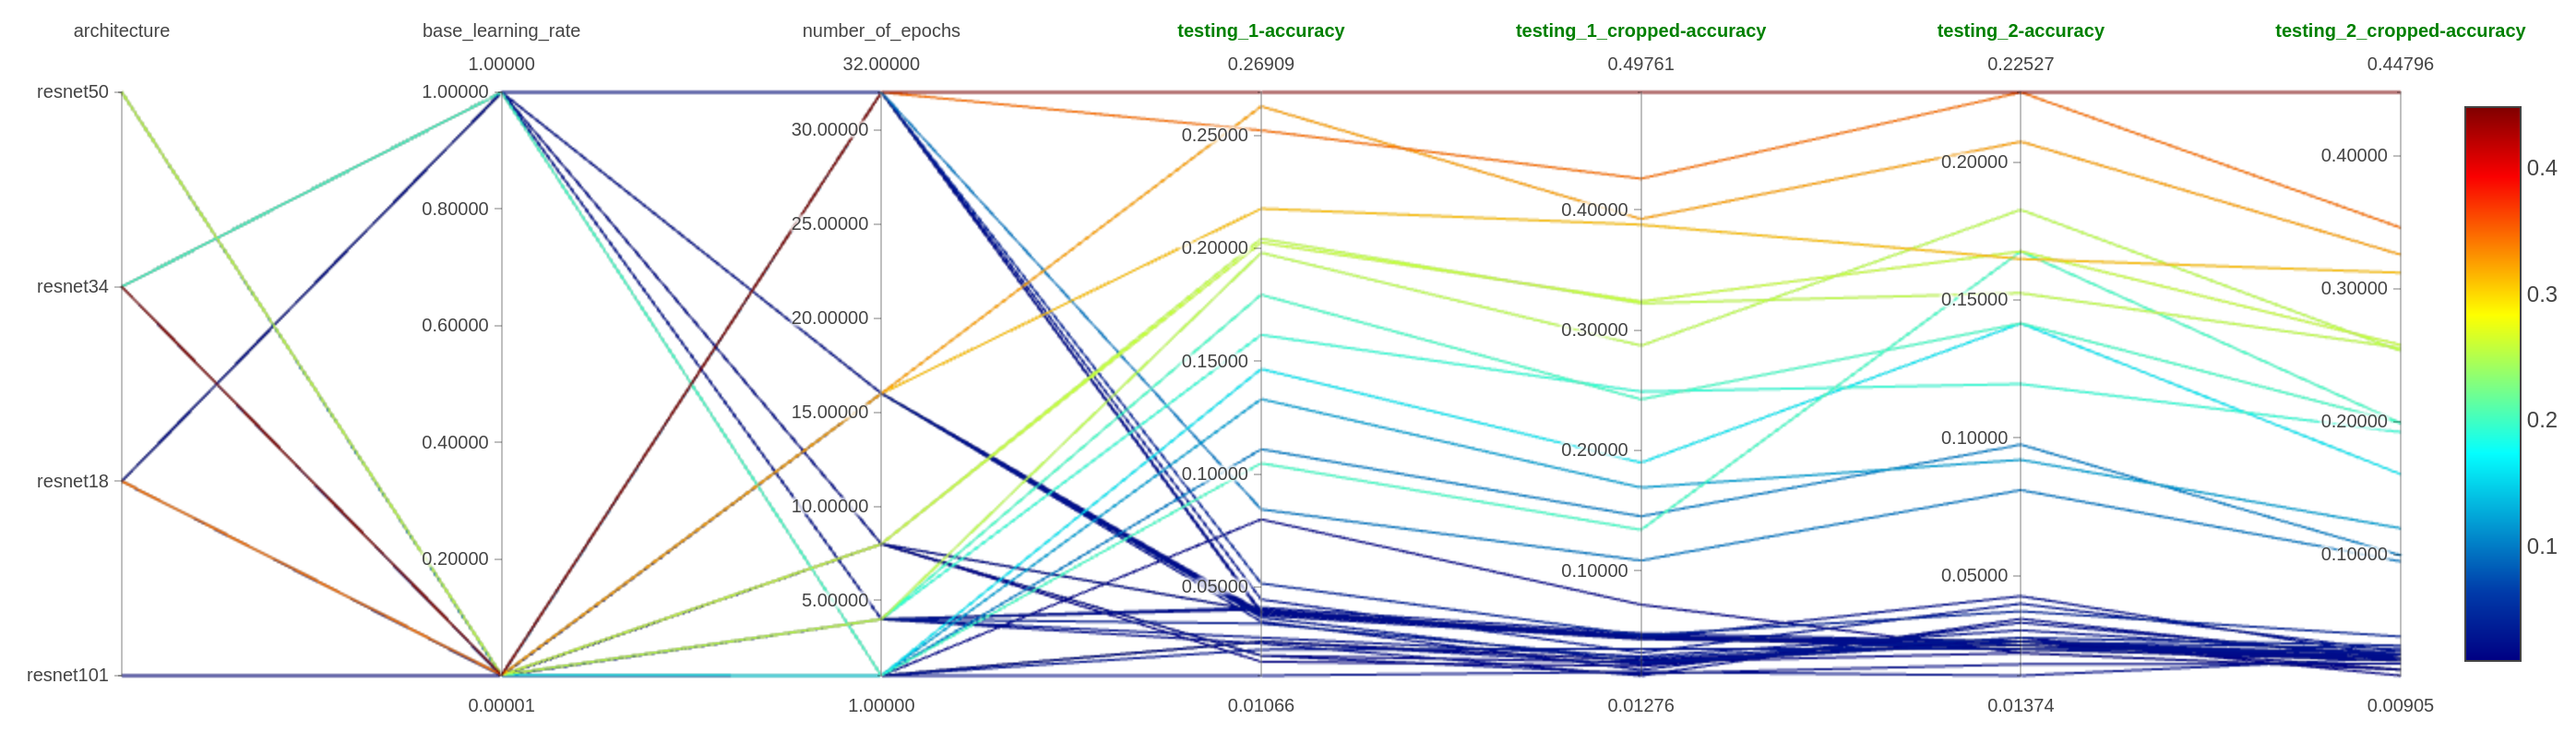
All the tests with resnet50 and resnet101 stopped prematurely for memory issues on my GPU.
As we can see:
- Leveraging the different architecture seems an excellent parameter to tweak (dah), but more x on the resnetx seems more trouble
- The number of epochs is also essential (dah); there is a mechanism to stop the training if the model doesn’t seem to learn based on the evolution of the loss function.
- For the learning rate, it seems that smaller values are more efficient (dah)
I will run a final experiment on the resnet by applying the base_lr from the lr_find method (0.002, seems a good value from the function) on a model based on resnet34 with the entire dataset and 32 epochs. There is a comparison of the accuray of the different model (I added the best model of the grid search and the final experiment)
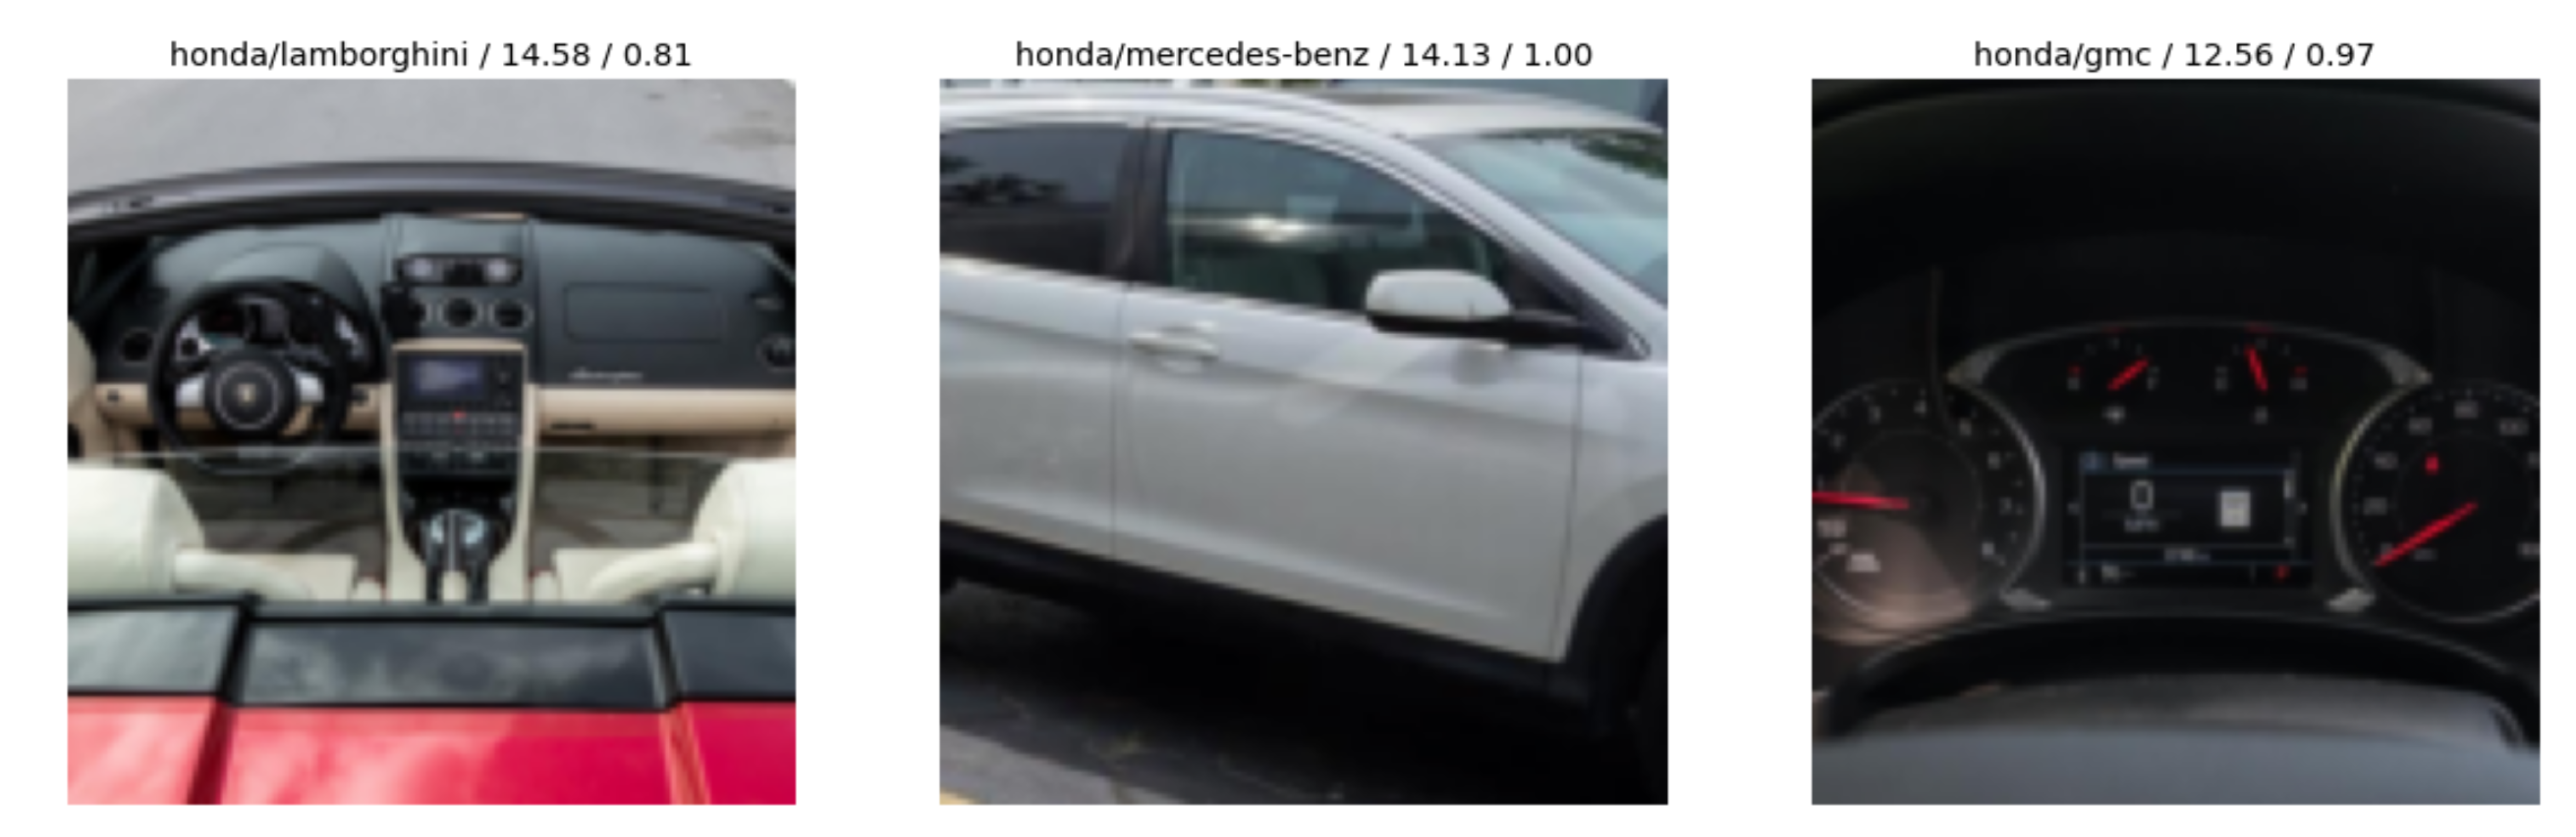
Now we have that seems to have decent accuracy; if you want to use this tweaked model, you can find it here with a notebook to start to use it, there is a glimpse of the result.
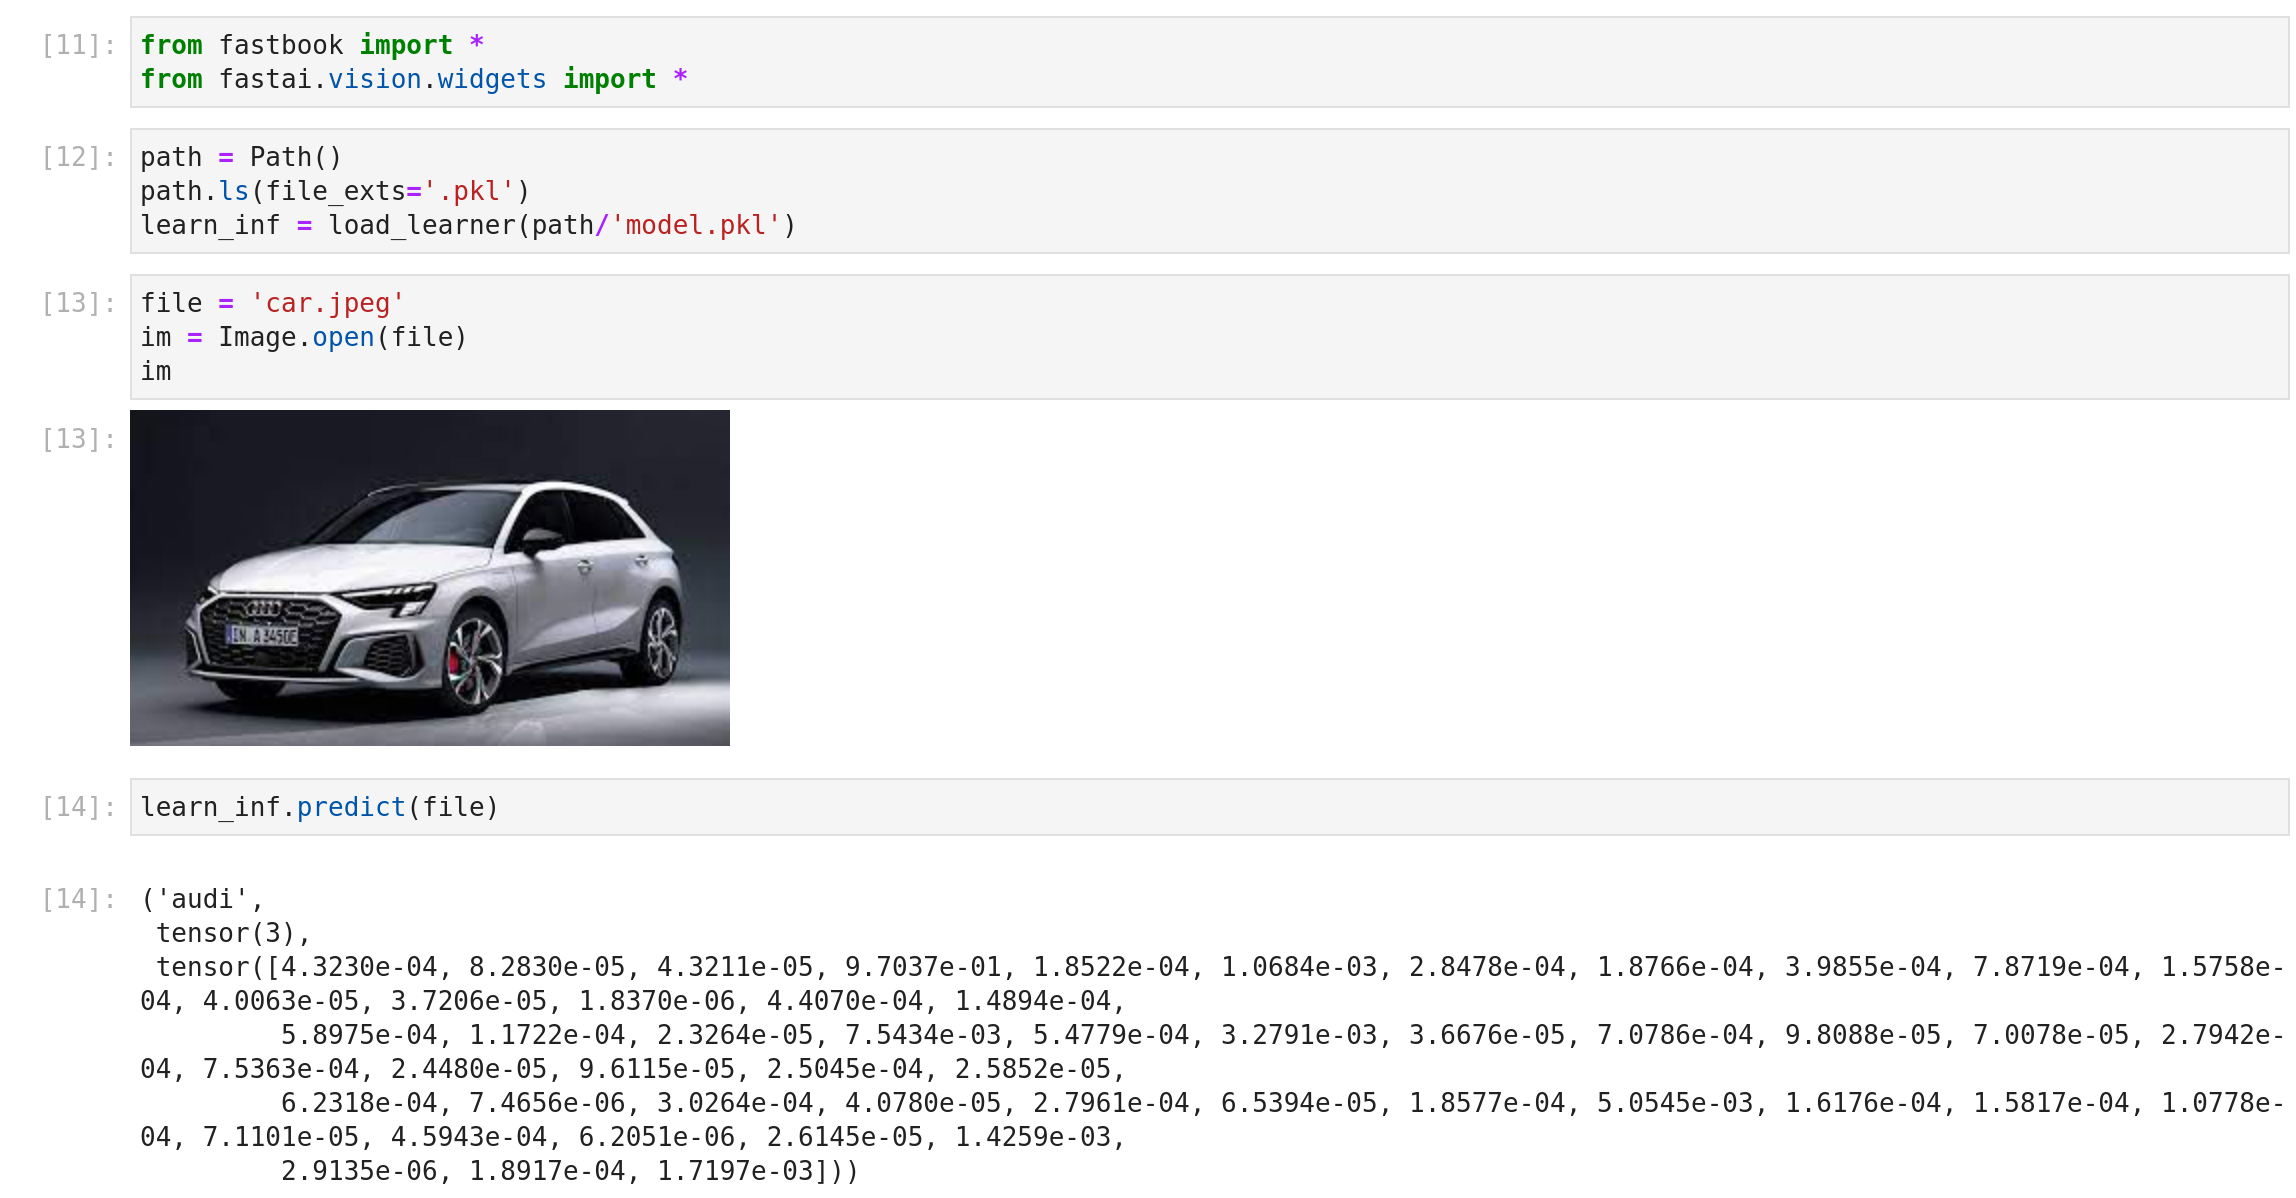
So satisfying , enjoy !!!
Conclusion
This experiment has been compelling; I have a first model that can fit my need for my proof of concept; of course, it’s not perfect, but it is still a good baseline that I can iterate. If I had mode rime and motivation, there are a few things that I would have tried (or will try):
- Work on the dataloader and testing the impact of the data augmentation and resizing on the model efficiency; building a model is a thing, but the data processing is, I think, also important
- This dataset is super imbalanced, trying to handle that
- Use other metrics for the evaluation, accuracy is a good thing, but there is way more metrics that could be pertinent than this one (but still a good start)
- Taking more time to investigate other architecture
- Deploying the model as a web application to make it available for everybody (I will maybe do that at some point #streamlit)
For fastai, the experiment was excellent. I just scratch the package. There are exciting functions around text, tabular data, and recommendation (with collab) that I will use later in the year. I am advising people to try it to discover deep learning systems like an image classifier.


