I recently decided to experiment with Docker containers to build standalone applications to optimize the operation flow of my different data/scraper pipelines. I have limited experience with Docker; I used it in some PoCs in my previous job and a few tests of libraries like NVIDIA Merlin. This article will describe my experience and the components of one of my pipelines running in a Docker container in AWS.
Overview of the pipeline
The application I want to ship is a typical pipeline I am operating on to get data for my side projects. This pipeline aims to reach a data source, collect new data and store it somewhere in the cloud; in the following figure, there is an overview of the pipeline.
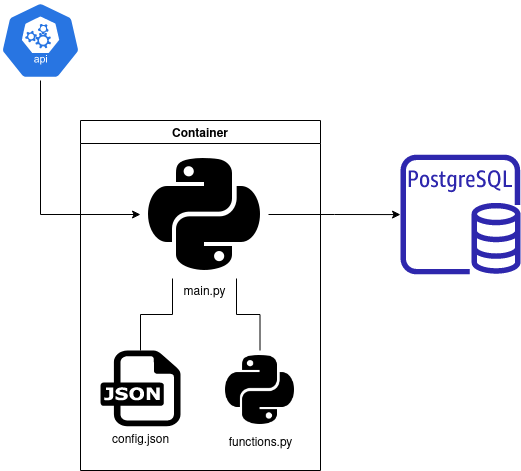
The idea of the pipeline is to call an API to fetch new information via the main.py script that will save new data in the PostgreSQL instance on AWS (in a dedicated database).
I set this PostgreSQL instance for a future project, and the configuration is minimal ( I used the default setup for an AWS free tier to start). I strongly recommend using pgadmin for manual interaction with the various databases of your instance ( I created the database for this project in a few clicks).
The main script will collect the credentials (user information) to reach the database via the config.json file (to build the credentials, I used a CREATE USER command with a password on pgadmin) and write the new contents in the database. Also, the main.py script calls external functions written in the functions.py file, a list of functions that can be reused in other parts of the overall project (I am planning to make a package of it more accessible in the future to maintain and deploy).
PS: During the conception of this application, I found the YouTube channel of John Watson Rooney; there are excellent explanations on how to structure your code in a context of a scraper like in this video.
The container is composed of all this code; if you want to see more details on the file’s structure, there is a link to the repository.
Let’s see the container now in more detail.
Build the container
In the description of this article, I mention Docker and container, but what’s a container? From Docker documentation, a container is
“a standard software unit that packages up code and all its dependencies, so the application runs quickly and reliably from one computing environment to another. A Docker container image is a lightweight, standalone, executable package of software that includes everything needed to run an application: code, runtime, system tools, system libraries and settings.”
That is a pretty cool definition, hein !? In my word, a container is just an application running as a standalone on a corner of a server in total independence, and that can be deployed on all kinds of machines :). This approach, from my perspective, is efficient and was an excellent substitute for a virtual machine that is (for me !?) an entire machine (OS + application) where the container is just the application directly. If you want to learn more about the difference between container and virtual machines, there is an interesting video of IBM or the container section of lesson 5 full stack deep learning course.
First, I needed to install Docker CLI on my ubuntu machine, and I followed this tutorial.
PS: in this tutorial, they advise to sudo the installation, but after for me, I need to sudo on all my docker commands, so maybe not the most brilliant move to make.
With everything set, let’s talk about the container; as mentioned before, there is currently the main script, with a functions dependency and a configuration file for the execution. These files are at the root of the project. In parallel with the code for the execution, we need to have :
- Information on the python environment for the execution, I built a requirements.txt file with the dependencies. There is a copy of the requirements.txt
requests==2.25.1
beautifulsoup4==4.9.3
# psycopg2==2.9 # commented to highlight the usage of binary
psycopg2-binary==2.9.3
SQLAlchemy==1.4.39
pandas==1.1.3
joblib==1.1.0
This environment uses pyscopg2 to interact with the database and update information on some elements. Unfortunately, the basic package is incompatible, and the binary version must be installed to work on a docker container.
- A configuration for the container in the DockerFile file. This file is like a bash script with the different steps to execute. There is a copy of the file.
FROM python:3.6.12-slim-buster

WORKDIR /app

COPY requirements.txt requirements.txt
RUN pip3 install --upgrade pip
RUN pip3 install -r requirements.txt

COPY . .

CMD [ "python3", "main.py", "--config", "config.json"]
#CMD [ "python3", "main.py", "--config", "config.json", "--debug"] # To test the code in debug mode
In the DockerFile, there are the various steps to execute:
- Define the flavour of the application; in this case, a python 3.6 application
- Creation of a working directory
- Installation of the dependencies with pip
- Execution of a python3 command
This last command is composed of two arguments, one related to the location of the configuration file and the other one in the execution mode (in debug mode, which is convenient for testing the entire pipeline). There is an example of the function to parse the arguments in the main script.
import argparse

def get_arguments():# Function to get the argument provided with the python cmd
    parser = argparse.ArgumentParser(description='Collect new data')
    parser.add_argument('--config', type=str, help='Location of the configuration file of the pipeline', default="./config.json")
    parser.add_argument('--debug', help='Boolean to determine the mode of execution', action="store_true")# To manage boolean
    args = parser.parse_args()
    return args
The management of a boolean argument may not be evident, so I wanted to share it here. If you want more details, look at the sample in the GitHub repository once again.
To execute the container, you need to be in the same folder and execute the first command to build the container and the second one to execute it.
# Build the container
sudo docker build --tag sc-collect-new-data .

# To test the execution
sudo docker run sc-collect-new-data
Everything is set; let’s see how to deploy it in the cloud.
Ship the container on the cloud
I decided to skip the traditional old-school EC2 way to deploy on AWS. I wanted to have a stack that could fit the needs because usually, for his kind of project, there is no need to have during days a machine that is running because, in scraping applications, there are two key elements:
- With the rush of the launch, a lot of data to collect, but after a few days, it can be less data
- Sometimes the pipeline can break (exceed the API call per minute)
An excellent alternative to having a full-time server running it’s to leverage a service like ECS to run containers and use AWS Fargate as a serverless compute engine (thanks, @Antoine Leproust and @Geoffrey Muselli, for the quick morning brainstorming on the subject).
I am not an expert on this subject, so if you want to learn more about the technologies, look at the documentation or this Techworld with Nana video that recaps the service to launch a container on AWS.
Let’s go back to the project :)
First of all, to leverage ECS, I need to deploy the container in the cloud, and there is a service of AWS called ECR that’s like your bank of containers. The following two commands were the more critical to interact with the service easily.
#Create a repository
aws ecr create-repository --repository-name sc-collect-new-data

#Make the connection between AWS and Docker
aws ecr get-login-password --region us-east-1 | sudo docker login --username AWS --password-stdin accountid.dkr.ecr.region-code.amazonaws.com
PS: important the link the login is link to your AWS acount and region (define by the accountid and the region code
Let’s build and deploy the container with the following commands.
#Build the container with the right tag for the deployment
docker build --tag accountid.dkr.ecr.region-code.amazonaws.com/sc-collect-new-data .

#Push the container
docker push accountid.dkr.ecr.region-code.amazonaws.com/sc-collect-new-data
PS: I put all the 3 previous commands in a bash script to ease the deployment process just with one command.
The final step in the deployment is how to set the job in ECS; there are two main steps:
- I set an ECS cluster on the AWS UI in a few clicks, and I used the default values.
- Create a task with the task definition tool (cf picture, need to point to the container in ECR, and for step 2, I used the default values)
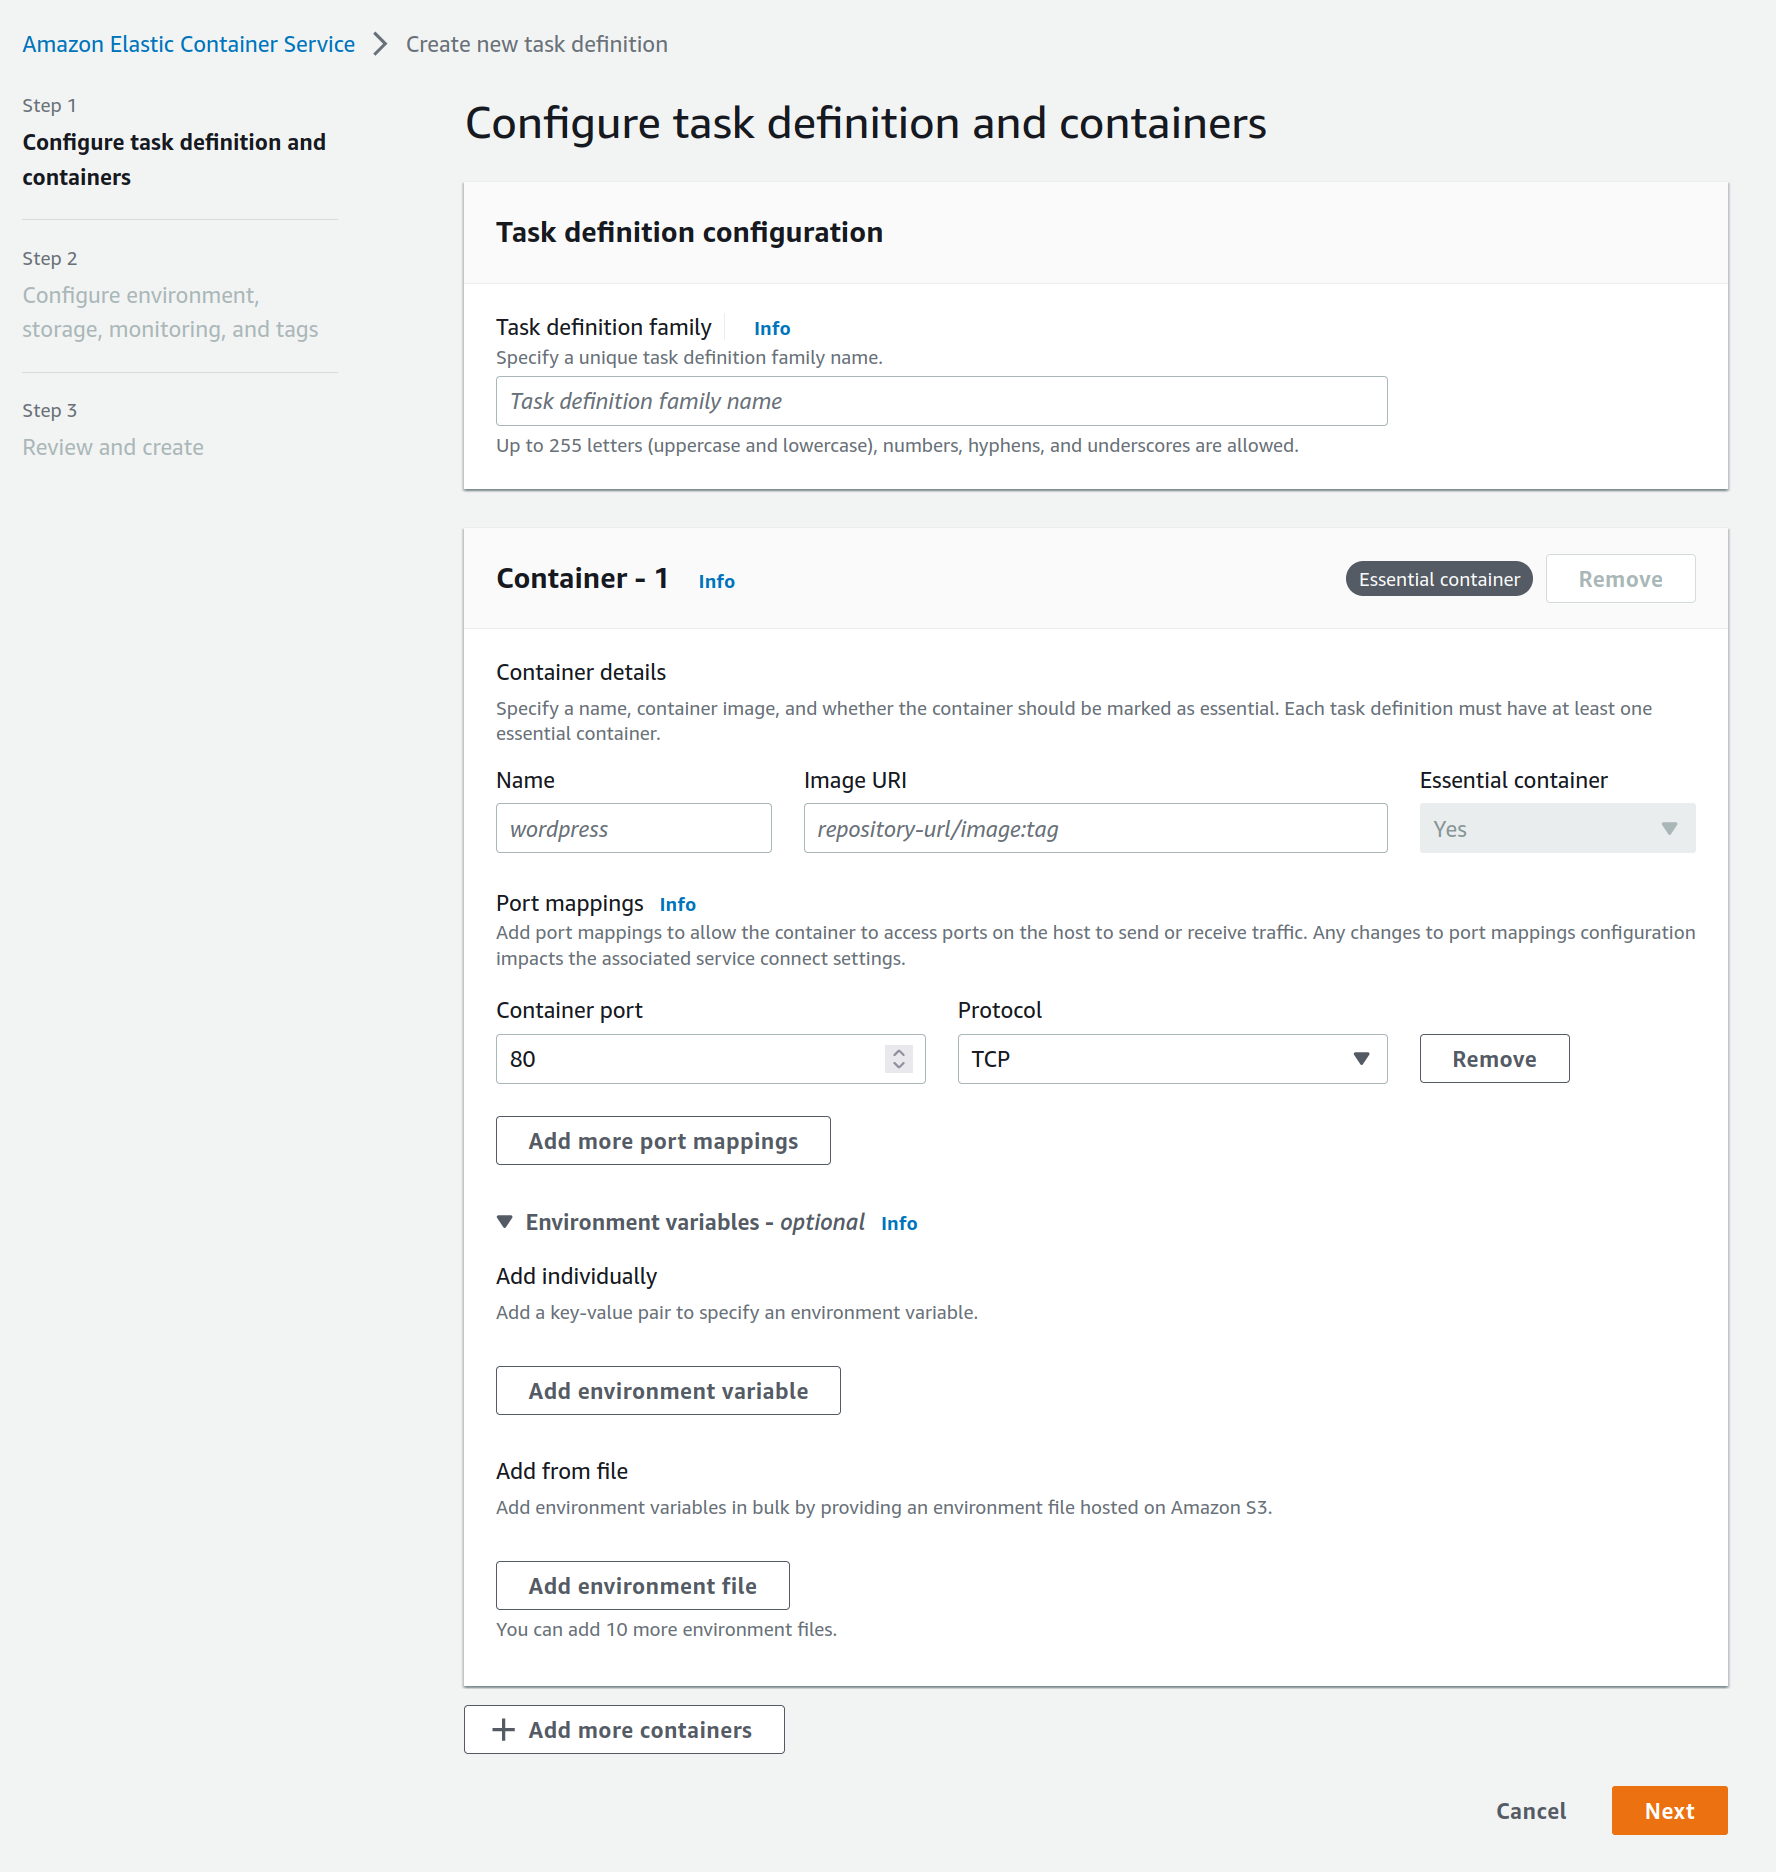
The AWS CLI or boto3 can be used for these two steps also. Everything is ready for the computation; let’s schedule it.
I didn’t find an option to schedule a task from ECS, so I decided to build a Chalice application ( I used it in the past for my sagemaker article and Twitter scrapper, so if you want some example of code). In this case, there is the overall structure of the code of chalice applications.
from chalice import Chalice, Rate
import boto3

app = Chalice(app_name='ecs_task_checker')

@app.schedule(Rate(7, unit=Rate.DAYS))
def every_week(event):
    for task_definition in ["name-of-the-task"]:
        check_task(task_definition)

@app.schedule(Rate(1, unit=Rate.HOURS))
def every_hour(event):
    for task_definition in ["name-of-the-task"]:
    # for task_definition in []:
        check_task(task_definition)
The idea is to have various lambda based on the frequency of updates of my pipeline to retrigger the task in case it’s inactive. The script tests the task’s status and retriggers if needed. I based the function on resource articles like this one.
def check_task(task_definition):
    client = boto3.client("ecs",
                      region_name="us-east-1",
                      aws_access_key_id="aws_access_key_id",
                      aws_secret_access_key="aws_secret_access_key"
                     )

    paginator = client.get_paginator('list_tasks')

    response_iterator = paginator.paginate(
        PaginationConfig={
            'PageSize':100
        }
    )

    task_running = False
    for each_page in response_iterator:
        for each_task in each_page['taskArns']:
            response = client.describe_tasks(tasks=[each_task])
            if (response["tasks"][0]["group"].replace("family:", "") == task_definition) and (response["tasks"][0]["lastStatus"]):
                task_running = True
                break
        if task_running:
            break

    if not task_running:
        print("Relaunching the task")
        response = client.run_task(
            taskDefinition=task_definition,
            launchType='FARGATE',
            cluster='default',
            platformVersion='LATEST',
            count=1,
            networkConfiguration={
                'awsvpcConfiguration': {
                    'subnets': [
                        'subnet-id',
                    ],
                    'assignPublicIp': 'ENABLED',
                    'securityGroups': ["security_group_id"]
                }
            }
        )
The critical thing to remember is the security group and subnet that needs the proper setup to fit the database requirements to reach out.
And voila, there is a data pipeline in a container running on the cloud in a serverless manner.
Conclusion
Overall it has been an interesting experience to work with Docker to standardize the deployment of my data pipeline. In addition, it gives me a starting point for the following data projects by having an environment skeleton and structure of my code (I see also plenty of improvements).
Docker containers are an exciting way to work and, for my domain ML, an excellent way to wrap your pipeline. ECR and ECS with Fargate are an excellent combo to operate your container efficiently, but from what I see, GPU usage seems impossible.
There are always heated debates on what a data scientist should know on the way to deploy pipelines and models (a good article on the subject from Chip Huyen HERE), and I think working on this project was a perfect moment to:
- Better understand the structure of a container; honestly, I found it pretty simple to use in this context (and I think running a training job for an ML project will not be more difficult)
- Deploy containers in the cloud; I am not familiar with Kubernetes, but services like ECS are robust and a good start for people who want to deploy pipelines.


